Spot-On Network
Upgrade Process
(There is connectivity to all modules. NOTE:
Rebooting/Power cycling the CMM Micro may help gain
connectivity)
Field
Service Upgrades
(Connectivity can not be established with the intended
module)
Prepared by: Will Warren
- Apogee Wireless, Inc.
For: Spot-On Networks Monday, April 07, 2008
This training will
take 30 minutes to complete.
SM=Subscriber Module
AP=Access
Point Module
BH=Backhaul Module
Module=any of the above
Last updated: Monday April 07, 2008.
Motorola has received a number of reports of quality issues with new shipments of Canopy radio modules.
This bulletin will
communicate the status of Motorola’s investigation into the reported
problems.
Motorola has determined that the RF issues are due to a
higher than expected failure rate of a particular RF switch component used on
all Canopy radio modules -
* except for the 900 MHz band products.
*
The precise root cause for the elevated
failure rate of this component is still the subject of an extensive
investigation.
* This problem is particularly aggressive with Canopy APs, although
SMs and BHs may be affected, based on traffic.
The result of
this is that we are observing failure rates on Canopy radio modules that are
above the very low failure rate.
Motorola is developing an update to Software Release 8.2 that
addresses the failure case.
- The reports received fall into two
categories:
1) Reports of loss of RF sensitivity or
inability to maintain an RF link.
2) Reports
of Ethernet port lock up.
Click here to watch a
video that will give you a primer on 8.2 upgrades and DFS/Regional codes, as
well as Auto-Negotiate "receive" lockups.
-16
minutes-
Spot-On Network Upgrade Process
-
Summary:
The work-around fix is accomplished with software upgrades to 8.2.1 dated
after July 2007, that detects and immediately unlock most lockups, with no
system or user impact.
- Hardware versions: P7 and P8 APs, BHs, cannot be upgraded!
Click Here to
Report P7 - P8 modules!
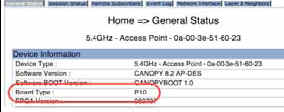
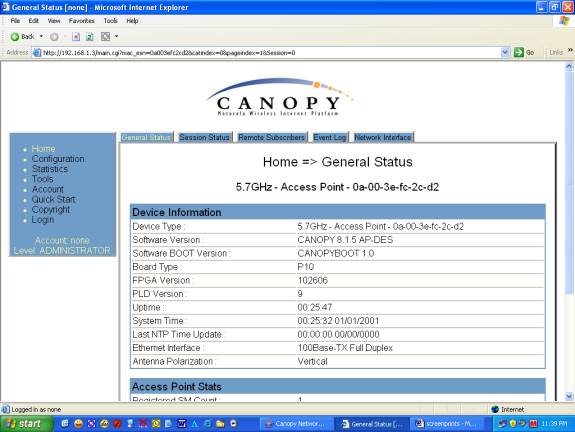
To find the hardware versions:
1. For modules running Release 8 or greater- On the
General Status Page under "Board Type." (Fig. 1)
2. For modules running a
Release less than 8, look to see if there is an option for "Scheduling" then it
is a P9. (Fig. 2)
Fig. 1
Fig. 2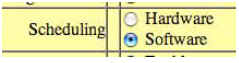
- Required
Software Upgrade Path for Motorola Modules:
Caution: Upgrades must follow upgrade path to prevent
complete hardware failure!
Here is the CNUT's
software matrix:
7.0.7 will require CNUT ver.1.1 and
can upgrade to 7.2.9
7.2.9 will require CNUT ver.1.1 and
can upgrade to 7.3.6
After you finish with CNUT 1.1, you
will need to bring up the AP/SM configuration page in your browser
and
change from SOFTWARE SCHEDULING to HARDWARE SCHEDULING or CNUT 2.2
will not update the selected element.
7.3.6 will require
CNUT
ver.2.2 and can upgrade to 8.2
8.1.5.
will require CNUT ver.2.2
and can upgrade to 8.2
The files have been updated for
download.
However, please CLICK HERE
to understand the problems if upgrading from 7.0.7
04/07/2008
08:36:58
AM
*Remember, be sure to check your hardware version! P7 and P8 may need to be replaced.
*** It might be required to know the Channels for
your frequency.***
Connectivity issues may require a different
channel to bypass signal interference from new radar
sources,
implemented after the Spot-On site was initially
installed.
Click Here for Canopy
Frequencies and Channels
The following are the steps to upgrade modules via the Spot-On Network:
First download the
following files to the same folder: ( "SAVE",
don't "OPEN" on download)
- CNUT
2.2 (Canopy Network Updater
Tool)
- CNUT 2.2
Help File and Installation Notes
- Canopy Software
Release 8.2.1 DES .pkg2 Upgrade zip file
(This file
only works with CNUT 2.2 and ONLY upgrade from Software Release 8.1.5!
)
Remove any previous
versions of CNUT 2.1 or earlier and backup any CNUT created network files before
installing CNUT 2.2.
Make sure your PC is
configured to connect via IP to the network your APs/SMs are
on.
Check the status of link via IP
through the Pronto. Can you see the GUI of the AP/SM in Internet
Explorer?
Gain connectivity with the AP GUI, first and set the
Ethernet speed to "100Mbps Full Duplex." Save Reboot
If you are in the lab or the field, one may
gain connectivity by setting your TCP/IP Settings to "Obtain an IP Address" and
connect to AP with POE Injector to PC. Repair Local Area Connection and the
SM/AP IP address will be 169.256.1.1 Click Here to learn
more
Gain connectivity with the SM GUI and set the Ethernet speed to "100Mbps Full Duplex." Save Reboot
The link should become more robust and this fixes the auto-negotiate/full/half duplex bug.
Install CNUT 2.2 software.
After you have installed - CNUT 2.2 (Canopy Network Updater Tool) - CNUT 2.2 Help File and Installation Notes
and you have the package file in a handy location - Canopy 8.2.1 DES package zip file (ONLY upgrade from Software Release 8.1.5! )
and you have connectivity to ping the AP/SM and access their GUIs...
we can now start using CNUT 2.2
The process for upgrading Canopy Products is simple in the number of steps, but very difficult when it comes to every step has to be perfect. So the following screen prints should help..
Here are the terms you need to understand, first.
Root = The Network
Elements =
APs/SMs
Update = Upgrade
Package = Update File that ends
.pkg2
Launch CNUT 2.2 and "clean the workspace" by
selecting a New Network Archive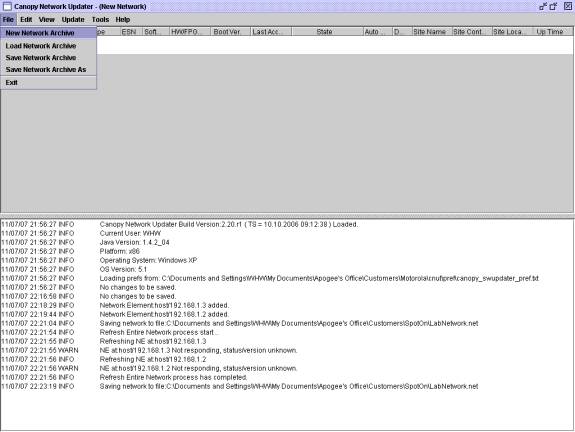
Notice the lines in the lower part of the CNUT
Utility... It is your very important log file...it tells you what is going
on.
You may need to wait up to 5 minutes after trying some things to see if
it takes.
If you don't see the results you expect, then rebooting the element
may update the log file. Don't get in a rush.
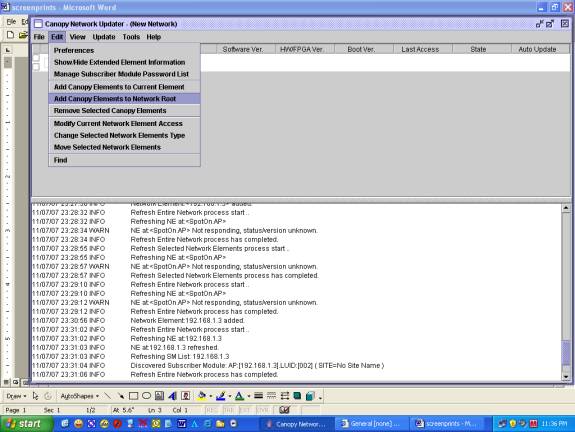
Next we need to add elements to the Root.
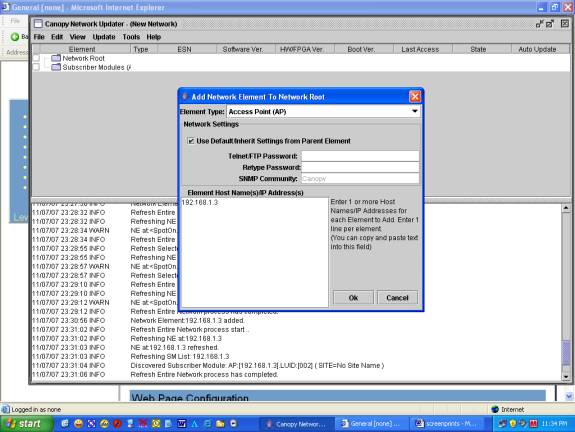
Now we need to refresh the view in order to have CNUT discover the new
element.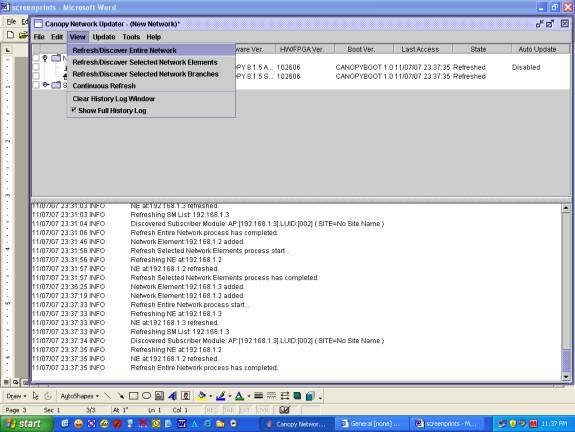
* If the element's software version and boot file version, etc...aren't
displayed, then check physical connectivity,
try to ping the device, then
check the "State" field above for error message. *
Next we need to add the package file to the Update Tool.
Find CNUT Package File
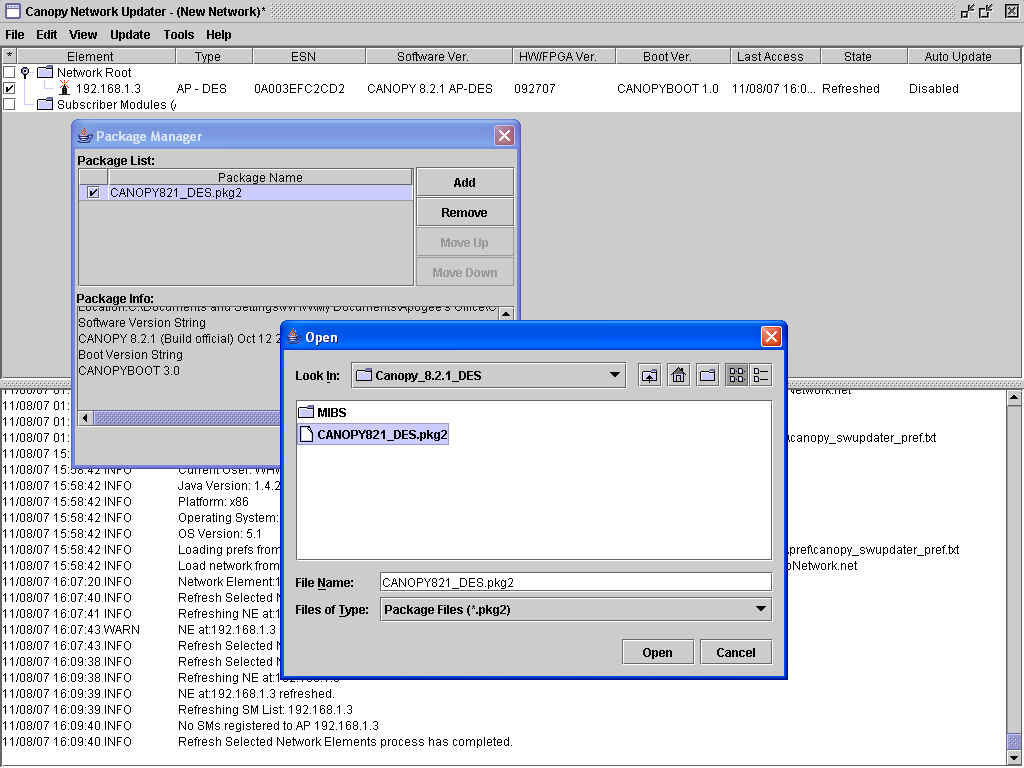
Now the CNUT Package file needs to be updated...or
upgraded
Be sure to check the Element to be upgraded, the AP in this
case...
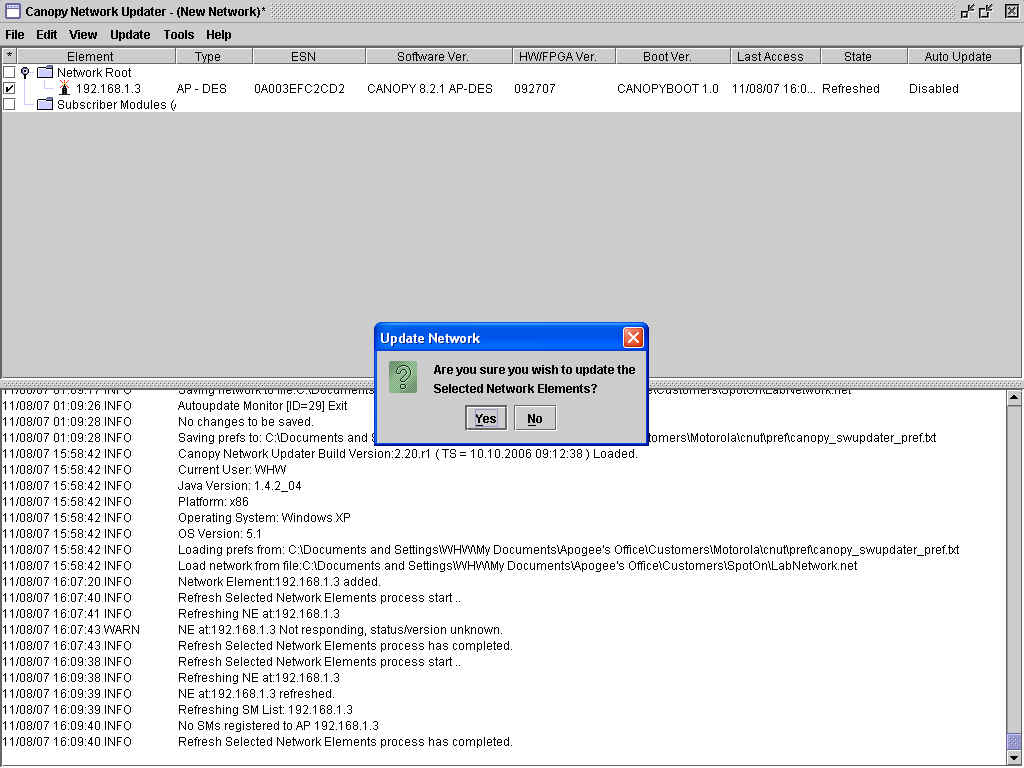
Choose yes and the CNUT Utility will update the AP.

Now Auto-Update on the AP needs to be set to send the Update to any associated SMs.
Selected Network Elements and Enable and choose OK
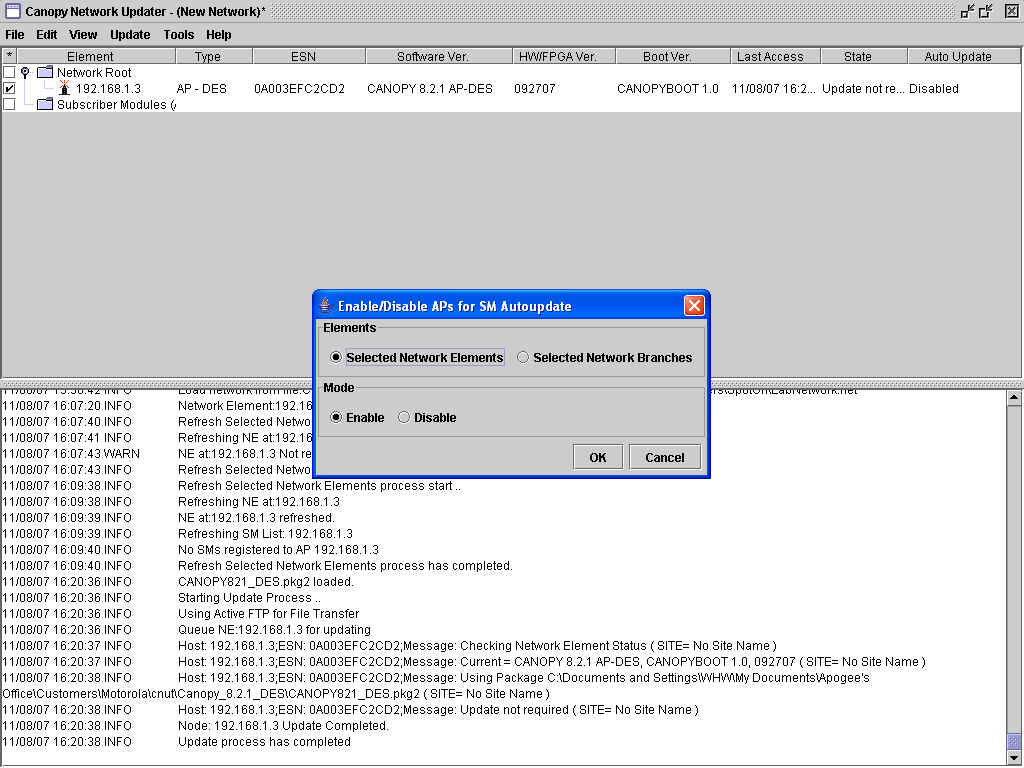
The Package file will be sent to the AP memory to be available for the SMs
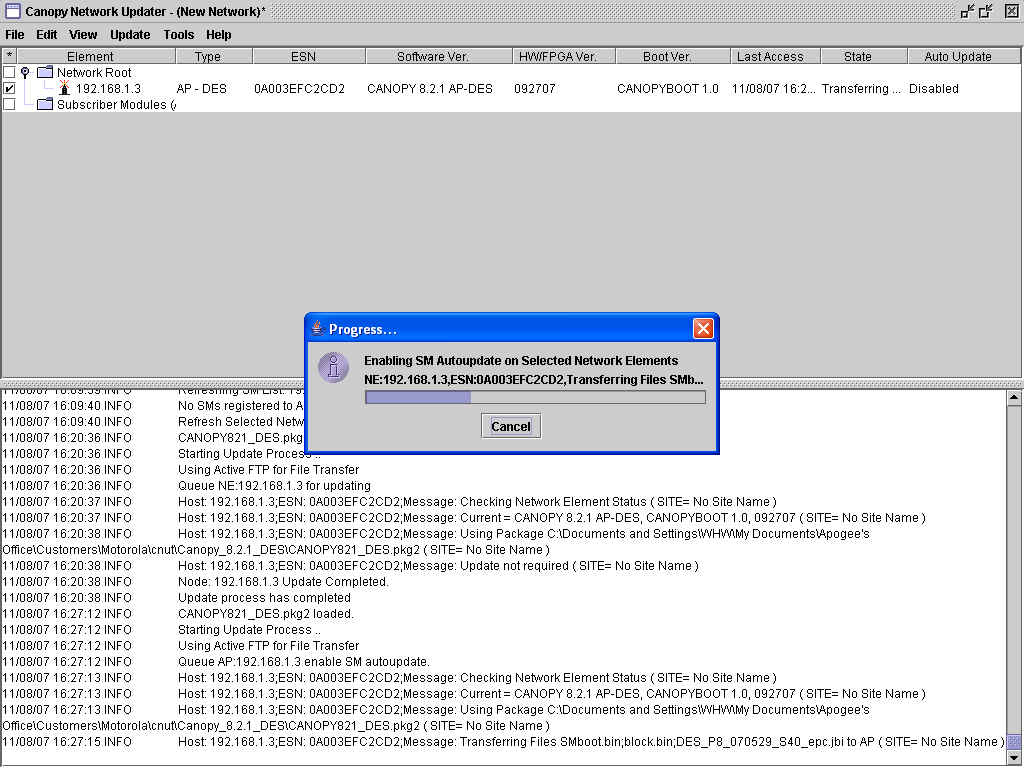
Afterwards....Note the log file at the bottom....the Auto-Update has started and will upgrade SMs as it finds them and can take 5 to 30 minutes, depending on the number of SMs and distance and traffic.
After the Auto-Update has completed your log file will state "completed" and auto-update should turn off.
Next bring up the GUIs of all the APs and SMs to see software version.
Occasionally an SM will
complete the software loading and fail to reboot, or in reality reboot,
but CNUT will display a messages such as “Reboot failed” or “Failed to
find Element in update. Cannot
open new telnet connection to device.”
In these cases,
where it appears the sector, in
general has upgraded successfully and is stable on Release
8.2.1,
First try a
Refresh/Discover. If that doesn’t result in CNUT showing the AP/SM
successfully on the new
release,
Consider rebooting
the AP/SM to see if that will bring it up on Release
8.2.1.
Set Region
Code on Configurations Page
After a sector or link or standalone module has been
upgraded to Release 8.2.1, confirm the Region Code on each module is set to the
local region - United
States
If
needed, set the Region Code correctly on each module, Save Changes, and
Reboot.
On new APs or BHMs, or APs or BHMs that have been reset to factory defaults, the
Region Code might need to be set before the module will transmit.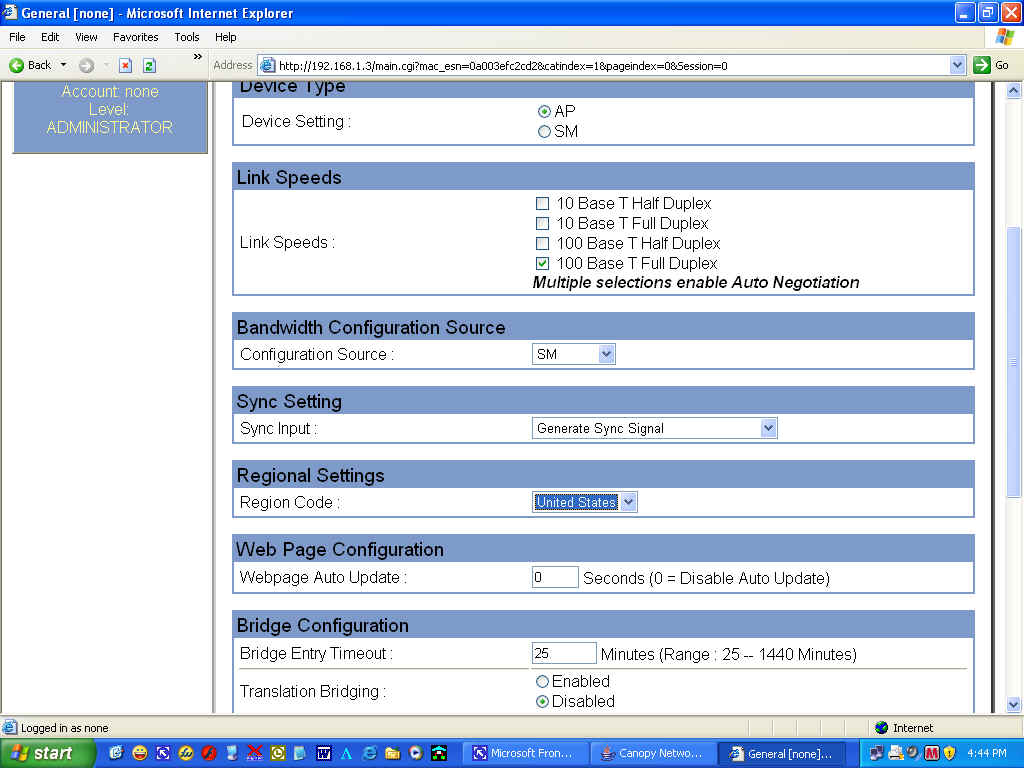
The Upgrade of the module is now completed.
Click Here if the Upgrade Failed
Field Service Upgrade Process
To connect in the
Field, you will need to call Spot-On
to have them configure one of the
8 switched Ethernet ports to NOT have power over
Ethernet.
Use a patch cable to connect your laptop to the newly re-configured
port.
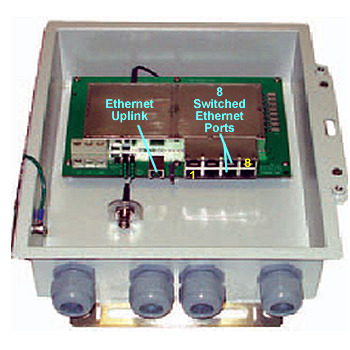
A
POE Injector
Kit is required for direct
connectivity to the Module, if there are not empty ports on the CMM.
(Fig. 1)
Fig.1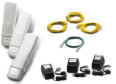
The following are the steps to upgrade modules via the
Field from
8.1:
A Field Service Request is
generated due to no connectivity to module(s) from the Spot-On
Network.
First download the
following files to the same folder: ( "SAVE",
don't "OPEN" on download)
- CNUT
2.2 (Canopy Network Updater
Tool)
- CNUT 2.2
Help File and Installation Notes
- Canopy
Software Release 8.2.1 DES .pkg2 Upgrade file
(This file only works with CNUT 2.2 and ONLY upgrade
from Software Release 8.1.5! )
CLICK HERE
if upgrading from 7.0.7 or 7.2.9
7.0.7 will require CNUT ver.1.1 and
can upgrade to 7.2.9
7.2.9 will require CNUT ver.1.1 and
can upgrade to 7.3.6
After you finish with CNUT 1.1, you
will need to bring up the AP/SM configuration page in your browser
and
change from SOFTWARE SCHEDULING to HARDWARE SCHEDULING or CNUT 2.2
will not update the selected element.
7.3.6 will require
CNUT
ver.2.2 and can upgrade to 8.2
8.1.5.
will require CNUT ver.2.2
and can upgrade to 8.2
The files have been updated for
download.
However, please CLICK HERE
to understand the problems if upgrading from 7.0.7
04/07/2008
08:36:58
AM
Remove any previous
versions of CNUT 2.1 or earlier and backup any CNUT created network files before
installing CNUT 2.2.
Make sure your PC is configured to connect via IP to
the network your APs/SMs are on.
Can you see the GUI of the APs/SMs in Internet Explorer?
Gain connectivity with
the AP GUI, first and set the
Ethernet speed to "100Mbps Full Duplex." Save Reboot
If you are in the lab or the field, one may
gain connectivity by setting your TCP/IP Settings to "Obtain an IP Address" and
connect to AP with POE Injector to PC. Repair Local Area Connection and the
SM/AP IP address will be 169.256.1.1 Click Here to learn
more
Gain connectivity with the SM GUI and set the Ethernet speed to "100Mbps Full Duplex." Save Reboot
The link should become more robust and this fixes the auto-negotiate/full/half duplex bug.
Install CNUT 2.2 software.
After you have installed - CNUT 2.2 (Canopy Network Updater Tool) - CNUT 2.2 Help File and Installation Notes
and you have the package file in a handy location - Canopy Software Release 8.2.1 DES .pkg2 Upgrade file (ONLY upgrade from Software Release 8.1.5! )
and you have connectivity to ping the AP/SM and access their GUIs...
we can now start using CNUT 2.2
The process for upgrading Canopy Products is simple in the number of steps, but very difficult when it comes to every step has to be perfect. So the following screen prints should help..
Here are the terms you need to understand, first.
Root = The Network
Elements =
APs/SMs
Update = Upgrade
Package = Update File that ends
.pkg2
Launch CNUT 2.2 and "clean the workspace" by
selecting a New Network Archive
Notice the lines in the lower part of the CNUT
Utility... It is your very important log file...it tells you what is going
on.
You may need to wait up to 5 minutes after trying some things to see if
it takes.
If you don't see the results you expect, then rebooting the element
may update the log file. Don't get in a rush.
Next we need to add elements to the Root.
Now we need to refresh the view in order to have CNUT discover the new
element.
* If the element's software version and boot file version, etc...aren't
displayed, then check physical connectivity,
try to ping the device, then
check the "State" field above for error message. *
Next we need to add the package file to the Update Tool.
Find CNUT Package File
Now the CNUT Package file needs to be updated...or
upgraded
Be sure to check the Element to be upgraded, the AP in this
case...
Choose yes and the CNUT Utility will update the AP.
Now Auto-Update on the AP needs to be set to send the Update to any associated SMs.
Selected Network Elements and Enable and choose OK
The Package file will be sent to the AP memory to be available for the SMs
Afterwards....Note the log file at the bottom....the Auto-Update has started and will upgrade SMs as it finds them and can take 5 to 30 minutes, depending on the number of SMs and distance and traffic.
After the Auto-Update has completed your log file will state "completed" and auto-update should turn off.
Next bring up the GUIs of all the APs and SMs to see software version.
Occasionally an SM will
complete the software loading and fail to reboot, or in reality reboot,
but CNUT will display a messages such as “Reboot failed” or “Failed to
find Element in update. Cannot
open new telnet connection to device.”
In these cases,
where it appears the sector, in
general has upgraded successfully and is stable on Release
8.2.1,
First try a
Refresh/Discover. If that doesn’t result in CNUT showing the AP/ SM
successfully on the new
release,
Consider rebooting
the AP/ SM to see if that will bring it up on Release
8.2.1.
Set Region
Code on Configurations Page
After a sector or link or standalone module has been
upgraded to Release 8.2.1, confirm the Region Code on each module is set to the
local region - United
States
If
needed, set the Region Code correctly on each module, Save Changes, and
Reboot.
On new APs or BHMs, or APs or BHMs that have been reset to factory defaults, the
Region Code might need to be set before the module will transmit.
The Upgrade of the module is now completed.
Click Here if the Upgrade Failed
To gain connectivity to your module at the CMM Micro.
Plugging your laptop into the CMM Micro Switch with POE active on the port may damage your Laptop!
1. Unplug the AP from
the CMM Switched Ethernet Ports and plug into the PoE Injector and your
Laptop.
Be sure you remember which port it was plugged
in.
*You will need to have all the IP addresses of the modules
you intend to upgrade, unless the AP/SM has been reset to defaults or is new out
of the box.
Once your laptop is configured to the same network IP addresses and Subnet Mask, launch Internet Explorer.
Type the IP Address of the module to be upgraded in the address bar of Internet Explorer.
If you connect then go < Back to Upgrade Instructions
Multiple items should be checked
under these circumstances.
The problem could be that an incorrect file is being used to upgrade a module. An example would be trying to use files pertaining to a SM instead of an AP. The user should verify that correct files and procedures were used to upgrade the module. If an incorrect file was used, the user should repeat the upgrade attempt with correct files. Once this is taken care of, no other corrective action will be necessary.
When upgrading the following message appears:“Error code 6, unrecognized devices.” The user should verify that the error is repeatable. Corrective action in this case is to Contact Us.
Make sure the proper FPGA files are being used.